반응형
Overview:
Spring Integration은 IP를 통해 메시지를 주고받기 위한 채널 어댑터를 제공합니다. UDP(사용자 데이터그램 프로토콜) 및 TCP(전송 제어 프로토콜) 어댑터가 모두 제공됩니다. 각 어댑터는 기본 프로토콜을 통한 단방향 통신을 제공합니다. 또한 Spring Integration은 간단한 인바운드 및 아웃바운드 TCP 게이트웨이를 제공합니다. 양방향 통신이 필요할 때 사용합니다.
pom.xml - 필요 라이브러리 작성
<dependency>
        <groupId>org.springframework.integration</groupId>
        <artifactId>spring-integration-ip</artifactId>
        <version>5.5.18</version>
</dependency>
TcpServerConfig.java - 설정 파일
import java.util.concurrent.Executors;
import org.springframework.beans.factory.annotation.Value;
import org.springframework.context.annotation.Bean;
import org.springframework.context.annotation.Configuration;
import org.springframework.integration.annotation.ServiceActivator;
import org.springframework.integration.channel.DirectChannel;
import org.springframework.integration.channel.PublishSubscribeChannel;
import org.springframework.integration.config.EnableIntegration;
import org.springframework.integration.ip.tcp.TcpInboundGateway;
import org.springframework.integration.ip.tcp.connection.TcpNetServerConnectionFactory;
import org.springframework.messaging.MessageChannel;
import org.springframework.messaging.support.ErrorMessage;

@Configuration
@EnableIntegration
public class TcpServerConfig {

  @Value("${tcp.port}")
  private int tcpServerPort;

  @Value("${tcp.maxConnections}")
  private int maxConnections;


  @Bean
  public TcpNetServerConnectionFactory tcpServerConnectionFactory() {
    TcpNetServerConnectionFactory connectionFactory = new TcpNetServerConnectionFactory(
      tcpServerPort
    );

    connectionFactory.setSingleUse(false); // 멀티스레드 모드를 사용하기 위해 단일 사용이 아님을 설정
    connectionFactory.setTaskExecutor(
      Executors.newFixedThreadPool(maxConnections)
    );
    return connectionFactory;
  }

  @Bean
  public TcpInboundGateway tcpInboundGateway() {
    TcpInboundGateway gateway = new TcpInboundGateway();
    gateway.setConnectionFactory(tcpServerConnectionFactory());
    gateway.setRequestChannel(tcpInboundChannel());
    gateway.setReplyChannel(tcpOutboundChannel());
    gateway.setReplyTimeout(5000); // 응답 대기 시간 설정 (예: 5초)
    gateway.setErrorChannel(tcpErrorChannel());
    return gateway;
  }

  @Bean
  public MessageChannel tcpInboundChannel() {
    return new DirectChannel();
  }

  @Bean
  public MessageChannel tcpOutboundChannel() {
    return new DirectChannel();
  }

  @Bean
  public MessageChannel tcpErrorChannel() {
    return new PublishSubscribeChannel();
  }

  @ServiceActivator(inputChannel = "tcpErrorChannel")
  public void handleErrorMessage(ErrorMessage errorMessage) {
    // 에러 메시지 처리 로직을 작성합니다.
    System.err.println("Error occurred: " + errorMessage);
  }

  @ServiceActivator(inputChannel = "tcpInboundChannel", async = "true")
  public String processMessage(byte[] payload) {
    // 동작 로직을 작성합니다.
    return tcpService.processMessage(new String(payload));
}
}
해당 라이브러리는 기본 직렬화 설정은 CRLF를 기준으로 하나의 전문으로 읽음.
테스트 방법.https://www.hw-group.com/software/hercules-setup-utility
Hercules SETUP utility | HW-group.com
www.hw-group.com
1. 사이트에서 최신 버전 download
2. 해당 exe 실행 화면에서 TCP Client 클릭
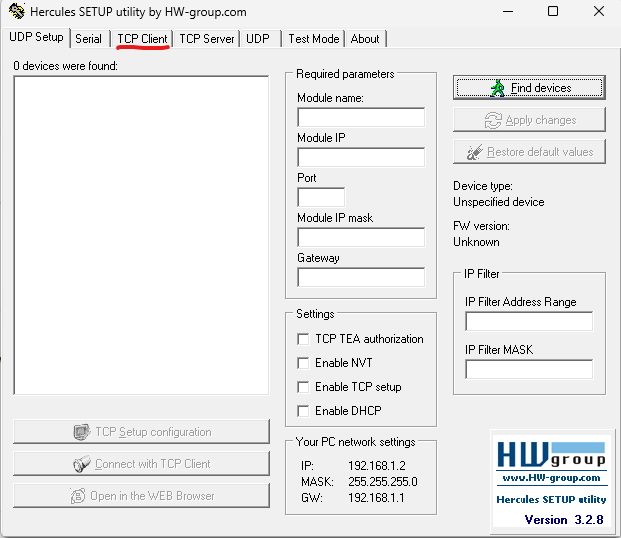
3. 서버의 IP와 PORT 입력 -> 메세지 입력 -> send 버튼 클릭 -> enter시 전문을 서버로 전송하여 테스트

반응형
'개발 > Spring Boot' 카테고리의 다른 글
| [Spring Boot] ssl 인증서 적용 및 발급(Let's Encrypt ) (0) | 2023.10.11 |
|---|---|
| [Spring Boot] war 패키징 방법 (0) | 2023.10.10 |
| [Spring Boot] ThreadPoolTaskExecutor 예제 (0) | 2022.04.04 |
| [SpringBoot] HikariPool stats logging (0) | 2022.03.31 |
| DAO, DTO, VO란 (0) | 2022.03.29 |